Next scheduled rescrape ... never
Version 2
Last scraped
Edited on 11/05/2025, 16:16:45 UTC
Original Topic: [TUTORIAL] Cold storage device on a Raspberry Pi
Author: apogio
Today we go build secure, air-gapped device, whr we go be able to create wallets and key fo offline.
Prerequisites
1. Di Raspberry Pi 4B (or any other model). e even better if di mode no support Wifi. But for dis tutorial I go used di Raspberry Pi 4B.
2. Di keyboard.
3. Di micro-SD card.
4. Di HDMI cable.
5. Di monitor.
6. Di computer wey connect to di internet.
7. Di USB thumb drive.
Flashing Raspberry Pi OS Lite fo SD card
1. Download Balena Etcher.
2. Download Raspberry Pi OS Lite frm dere official website.
3. Use Balena Etcher to take flash di OS photo fo SD card.
Downloading Sparrow Terminal
1. Download the Linux (ARM64) Standalone version (sparrow-server-2.0.0-aarch64.tar.gz) from the official website.
2. Drag and drop di tar.gz file for di USB drive.
Setting up di Raspberry Pi
1. Put di SD card to di card reader for Raspberry Pi.
2. Connect di device to di monitor use di HDMI cable.
3. Plug di power supply to di device.
Once di device turn on, e go ask u to create user and set di password.
After dat, u go log in and dey go present u wit di terminal.
Di terminal go be our padi from now on.
Doing some preconfiguration
Keep fo mind say since we no go plug in di Ethernet cable and we no go connect am to dis WiFi network, we go never connect to di internet.
But dis wan no dey enough!
Since we wan build di air-gapped device, we need cut off internet connection.
Code:
sudo crontab -e
Dis go open nano editor and dey go add di following line:Code:
@reboot sudo ifconfig eth0 down
@reboot sudo ifconfig wlan0 down
After we don do dat, everytime we reboot di device, network go switch off.@reboot sudo ifconfig wlan0 down
Installing Sparrow Terminal
We go now import di USB whr Sparrow Terminal dey instal.
Den, we need go to mount am.
Code:
lsblk
Dis command go produce di output whr we go see di USB and di disk partition (normally sometin like /dev/sda1 or /dev/sdb1 etc.).Make we say di USB dey on /dev/sda1.
We need to mount am, using di command:
Code:
cd /media
sudo mkdir usb
sudo mount /dev/sda1 /media/usb
sudo mkdir usb
sudo mount /dev/sda1 /media/usb
Now we go move am to folder, and we go take out di tar file onto our home path.
Code:
cd /media/usb
mv sparrow-server-2.0.0-aarch64.tar.gz home/<username>
mv sparrow-server-2.0.0-aarch64.tar.gz home/<username>
Den we go remov di usb.
Code:
sudo umount /media/usb
Now we go install Sparrow:
Code:
cd /home/<username>
tar -xvf sparrow-server-2.0.0-aarch64.tar.gz
rm -rf sparrow-server-2.0.0-aarch64.tar.gz
Now, we get Sparrow directory fo our home.tar -xvf sparrow-server-2.0.0-aarch64.tar.gz
rm -rf sparrow-server-2.0.0-aarch64.tar.gz
Let run am
Code:
cd Sparrow/bin
./Sparrow
./Sparrow
Once u run am, u go get sometin like dis:
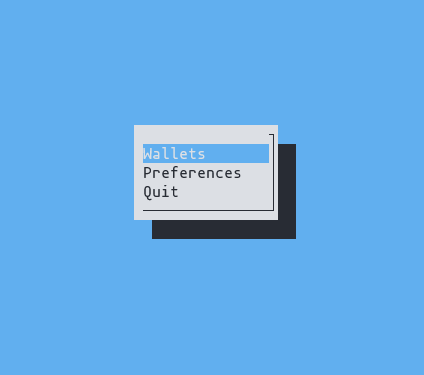
Den, press di "Wallets" button.
Dem go show u 2 options:
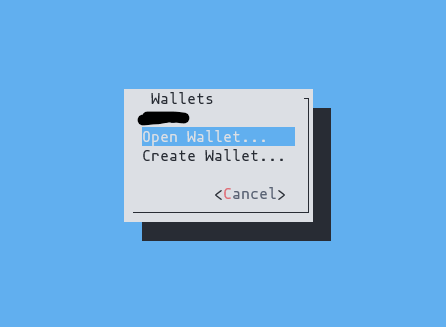
Jus chose "Create Wallet"
Notes:
- For easy matter, I never write di verification process fo di software wey we don download. But we always need verify di software wey we install.
EDITS by other members:
| User | Idea / Comment | |
| Cricktor | To switch off wireless internet, we fit edit di config.txt file, as follows: Code: sudo nano /boot/config.txt Den add dis line fo di end:dtoverlay=disable-wifi make u take disable wifi subsystem dtoverlay=disable-bt make you take disable Bluetooth subsystem Make u use both dtoverlay=... lines if u wan disable radio interfaces everything altogether. So, after you don make changes for di /boot/config.text make u reboot your Raspi so e go apply di change. If you no reboot am e go just de like say you no do anything and e no go change anytin. |
Version 1
Scraped on 04/05/2025, 16:21:46 UTC
Original Topic: [TUTORIAL] Cold storage device on a Raspberry Pi
Author: apogio
Today we go build secure, air-gapped device, whr we go be able to create wallets and key fo offline.
Prerequisites
1. Di Raspberry Pi 4B (or any other model). e even better if di mode no support Wifi. But for dis tutorial I go used di Raspberry Pi 4B.
2. Di keyboard.
3. Di micro-SD card.
4. Di HDMI cable.
5. Di monitor.
6. Di computer wey connect to di internet.
7. Di USB thumb drive.
Flashing Raspberry Pi OS Lite fo SD card
1. Download Balena Etcher.
2. Download Raspberry Pi OS Lite frm dere official website.
3. Use Balena Etcher to take flash di OS photo fo SD card.
Downloading Sparrow Terminal
1. Download the Linux (ARM64) Standalone version (sparrow-server-2.0.0-aarch64.tar.gz) from the official website.
2. Drag and drop di tar.gz file for di USB drive.
Setting up di Raspberry Pi
1. Put di SD card to di card reader for Raspberry Pi.
2. Connect di device to di monitor use di HDMI cable.
3. Plug di power supply to di device.
Once di device turn on, e go ask u to create user and set di password.
After dat, u go log in and dey go present u wit di terminal.
Di terminal go be our padi from now on.
Doing some preconfiguration
Keep fo mind say since we no go plug in di Ethernet cable and we no go connect am to dis WiFi network, we go never connect to di internet.
But dis wan no dey enough!
Since we wan build di air-gapped device, we need cut off internet connection.
Code:
sudo crontab -e
Dis go open nano editor and dey go add di following line:Code:
@reboot sudo ifconfig eth0 down
@reboot sudo ifconfig wlan0 down
After we don do dat, everytime we reboot di device, network go switch off.@reboot sudo ifconfig wlan0 down
Installing Sparrow Terminal
We go now import di USB whr Sparrow Terminal dey instal.
Den, we need go to mount am.
Code:
lsblk
Dis command go produce di output whr we go see di USB and di disk partition (normally sometin like /dev/sda1 or /dev/sdb1 etc.).Make we say di USB dey on /dev/sda1.
We need to mount am, using di command:
Code:
cd /media
sudo mkdir usb
sudo mount /dev/sda1 /media/usb
sudo mkdir usb
sudo mount /dev/sda1 /media/usb
Now we go move am to folder, and we go take out di tar file onto our home path.
Code:
cd /media/usb
mv sparrow-server-2.0.0-aarch64.tar.gz home/<username>
mv sparrow-server-2.0.0-aarch64.tar.gz home/<username>
Den we go remov di usb.
Code:
sudo umount /media/usb
Now we go install Sparrow:
Code:
cd /home/<username>
tar -xvf sparrow-server-2.0.0-aarch64.tar.gz
rm -rf sparrow-server-2.0.0-aarch64.tar.gz
Now, we get Sparrow directory fo our home.tar -xvf sparrow-server-2.0.0-aarch64.tar.gz
rm -rf sparrow-server-2.0.0-aarch64.tar.gz
Let run am
Code:
cd Sparrow/bin
./Sparrow
./Sparrow
Once u run am, u go get sometin like dis:
Den, press di "Wallets" button.
Dem go show u 2 options:
Jus chose "Create Wallet"
Notes:
- For easy matter, I never write di verification process fo di software wey we don download. But we always need verify di software wey we install.
EDITS by other members:
| User | Idea / Comment | |
| Cricktor | To switch off wireless internet, we fit edit di config.txt file, as follows: Code: sudo nano /boot/config.txt Den add dis line fo di end:dtoverlay=disable-wifi |
Original archived Re: Info-thread: Translation of Useful English topics to Pidgin {mix images}
Scraped on 04/05/2025, 16:16:38 UTC
Translated Topic in Pidgin Language; [TUTORIAL] Cold storage device on a Raspberry Pi
Original Topic: [TUTORIAL] Cold storage device on a Raspberry Pi
Author: apogio
Today we go build secure, air-gapped device, whr we go be able to create wallets and key fo offline.
Prerequisites
1. Di Raspberry Pi 4B (or any other model). e even better if di mode no support Wifi. But for dis tutorial I go used di Raspberry Pi 4B.
2. Di keyboard.
3. Di micro-SD card.
4. Di HDMI cable.
5. Di monitor.
6. Di computer wey connect to di internet.
7. Di USB thumb drive.
Flashing Raspberry Pi OS Lite fo SD card
1. Download Balena Etcher.
2. Download Raspberry Pi OS Lite frm dere official website.
3. Use Balena Etcher to take flash di OS photo fo SD card.
Downloading Sparrow Terminal
1. Download the Linux (ARM64) Standalone version (sparrow-server-2.0.0-aarch64.tar.gz) from the official website.
2. Drag and drop di tar.gz file for di USB drive.
Setting up di Raspberry Pi
1. Put di SD card to di card reader for Raspberry Pi.
2. Connect di device to di monitor use di HDMI cable.
3. Plug di power supply to di device.
Once di device turn on, e go ask u to create user and set di password.
After dat, u go log in and dey go present u wit di terminal.
Di terminal go be our padi from now on.
Doing some preconfiguration
Keep fo mind say since we no go plug in di Ethernet cable and we no go connect am to dis WiFi network, we go never connect to di internet.
But dis wan no dey enough!
Since we wan build di air-gapped device, we need cut off internet connection.
Code:
sudo crontab -e
Dis go open nano editor and dey go add di following line:Code:
@reboot sudo ifconfig eth0 down
@reboot sudo ifconfig wlan0 down
After we don do dat, everytime we reboot di device, network go switch off.@reboot sudo ifconfig wlan0 down
Installing Sparrow Terminal
We go now import di USB whr Sparrow Terminal dey instal.
Den, we need go to mount am.
Code:
lsblk
Dis command go produce di output whr we go see di USB and di disk partition (normally sometin like /dev/sda1 or /dev/sdb1 etc.).Make we say di USB dey on /dev/sda1.
We need to mount am, using di command:
Code:
cd /media
sudo mkdir usb
sudo mount /dev/sda1 /media/usb
sudo mkdir usb
sudo mount /dev/sda1 /media/usb
Now we go move am to folder, and we go take out di tar file onto our home path.
Code:
cd /media/usb
mv sparrow-server-2.0.0-aarch64.tar.gz home/<username>
mv sparrow-server-2.0.0-aarch64.tar.gz home/<username>
Den we go remov di usb.
Code:
sudo umount /media/usb
Now we go install Sparrow:
Code:
cd /home/<username>
tar -xvf sparrow-server-2.0.0-aarch64.tar.gz
rm -rf sparrow-server-2.0.0-aarch64.tar.gz
Now, we get Sparrow directory fo our home.tar -xvf sparrow-server-2.0.0-aarch64.tar.gz
rm -rf sparrow-server-2.0.0-aarch64.tar.gz
Let run am
Code:
cd Sparrow/bin
./Sparrow
./Sparrow
Once u run am, u go get sometin like dis:
Den, press di "Wallets" button.
Dem go show u 2 options:
Jus chose "Create Wallet"
Notes:
- For easy matter, I never write di verification process fo di software wey we don download. But we always need verify di software wey we install.
EDITS by other members:
| User | Idea / Comment | |
| Cricktor | To switch off wireless internet, we fit edit di config.txt file, as follows: Code: sudo nano /boot/config.txt Den add dis line fo di end:dtoverlay=disable-wifi |